Friday, January 30, 2015

Maple Butternut Squash Stuffed Shells

Disclaimer: The Laughing Cow provided me with product and a 450 gift card for this review. However, the thoughts and opinions are my own and do not necessarily reflect those of the brand. 

Butternut Squash is one of those awesome sweet vegetables. It is so smooth and flavorful and good for you all at the same time. I've had it as lasagna, ravioli, on the side...but I have never made it in a stuffed shell using a sort of cream cheese.

I was recently provided with Laughing Cow Swiss Cheese. This may not seem like a typical cheese for this kind of a dish - and you'd be right, but it was perfect! It is so creamy and mild but with just enough flavor to give the filling of these jumbo shells the perfect texture combined with the squash. 

Topped with the sweet Maple Butter Sauce and it's a decadent healthy indulgent weeknight dish.

Maple Butternut Squash Stuffed Shells

PREP TIME: 30 minutes
COOK TIME: 20 minutes
SERVES: 4-6 (about 20 shells)

INGREDIENTS

1 tsp evoo1 box jumbo shell pasta
12 oz cooked butternut squash
1 container Laughing Cow Spreadable Cheese, Original Swiss
1/2 cup Parmesan cheese
1/2 cup Italian cheese blend
1/2 cup 2% milk

3 tbsps unsalted all-natural butter
3/4 cup pure maple syrup
1 tsp cinnamon
1 tsp nutmeg


DIRECTIONS
Fill a large pot with water about 3/4 of the way, add a dash of salt and 1 tsp of evoo. Place on medium-high heat. When water comes to a boil add your pasta and cook until al dente. 


While water is heating, combine your squash, cheeses, cinnamon and nutmeg in a blender.
Cook pasta

In a food processor or blender, mix squash, cheeses 1/4 cup milk and 1 tbsp cinnamon. Mix until it forms a smooth puree. 


In a separate pot on medium heat, melt your butter. Once melted add in your maple syrup, remaining milk, cinnamon and nutmeg. Cook until comes to a slight boil, about 5 minutes.


Once pasta has cooked, strain, dry and place in your baking dish. Fill with a tablespoon of mixture. This will make about 20 shells. 


Pour your sauce over your shells. Cover and and bake for 20 minutes. 

Top with a little more sauce from your pan before serving and voila! 


Enjoy!

Fill shells 
Pour sauce over top
Cover with tin foil
Bake 350 20 mins 

Thursday, January 29, 2015

Blueberry Quinoa Pancakes

When pregnant our bodies take the good nutrients from our food and give them to baby before we see any bit of them - which is exactly what we want! But often this leaves those fatty remnants for us to absorb. This is why exercise is so important because exercise turns those fats into energy, and why eating a healthy protein-filled breakfast can really make a difference in how we feel and look at the end of the day.

These quinoa pancakes are so delicious and a great way to get healthy proteins into your baby's body, your body and your toddler's little body! Here are some of the reasons - aside from the buttery, nutty flavor it adds - that I love quinoa!


  • Quinoa is one of the most protein-rich foods we can eat. ...
  • Quinoa contains almost twice as much fiber as most other grains. ...
  • Quinoa contains Iron. ...
  • Quinoa contains lysine. ...
  • Quinoa is rich in magnesium. ...
  • Quinoa is high in Riboflavin (B2). ...
  • Quinoa has a high content of manganese.

I will make a whole batch of these and stick the leftovers in a freezer bag and just reheat in the microwave on mornings when McKinley and I want them for breakfast. She can be finicky when it comes to blueberries, (she doesn't really care about all the great antioxidants they provide her) so I will make about half of these with just one or two blueberries in them. 

BLUEBERRY QUINOA PANCAKES

PREP TIME: 15 minutes
COOK TIME: 30 Minutes
SERVES: 16 pancakes

1 1/2 cups all-purpose flour 
1/2 cup quinoa flakes
2 tsps baking powder
1 tsp baking soda
dash of salt 
2 egg whites + 1 egg
1 1/2 cups milk
1 tsp pure vanilla
1 tsp pure maple syrup
1 cup fresh blueberries (frozen is fine, too)
1-2 tbsp evoo


In a small mixing bowl combine your dry ingredients. 


In a mixer, add your egg whites and mix on high until fluffy - this is a great trick I learned from the Food Network which helps to make those pancakes nice and light! This especially comes in handy when you don't use sugar, like we are doing today.


Add in the remaining ingredients, but save the blueberries for later. 
Pour the bowl of dry ingredients into the mixing bowl and mix on low until combined.


Lastly, gently fold in the blueberries. 
Heat a skillet to medium heat. Add a tablespoon of evoo (or your choice of oil) to the pan. You will only need to do this a couple of times while cooking your pancakes. 


Pour about 1/4 cup of mix onto the pan for each pancake.


When the batter begins to bubble, flip!


Continue cooking until the pancakes are nicely browned on each side and cooked through the center - 3-4 minutes per side.


Top with a little butter and enjoy your protein-filled breakfast! 


Thursday, January 22, 2015

Stuffed Green Peppers

We had a super busy afternoon today. First, McKinley had a few friends coming over for a play date who Mike photographed as part of a story I am writing for the Magazine. Then, McKinley and I went to her first ever gymnastics class! It is a Mommy& Me class so I participated, sorry no photos, but it was really cute. She learned how to somersault, handstand, hang off the bars, and she got to jump on the trampoline into the big pit - her favorite of course.

So for dinner tonight, I prepared ahead of time while McKinley napped.

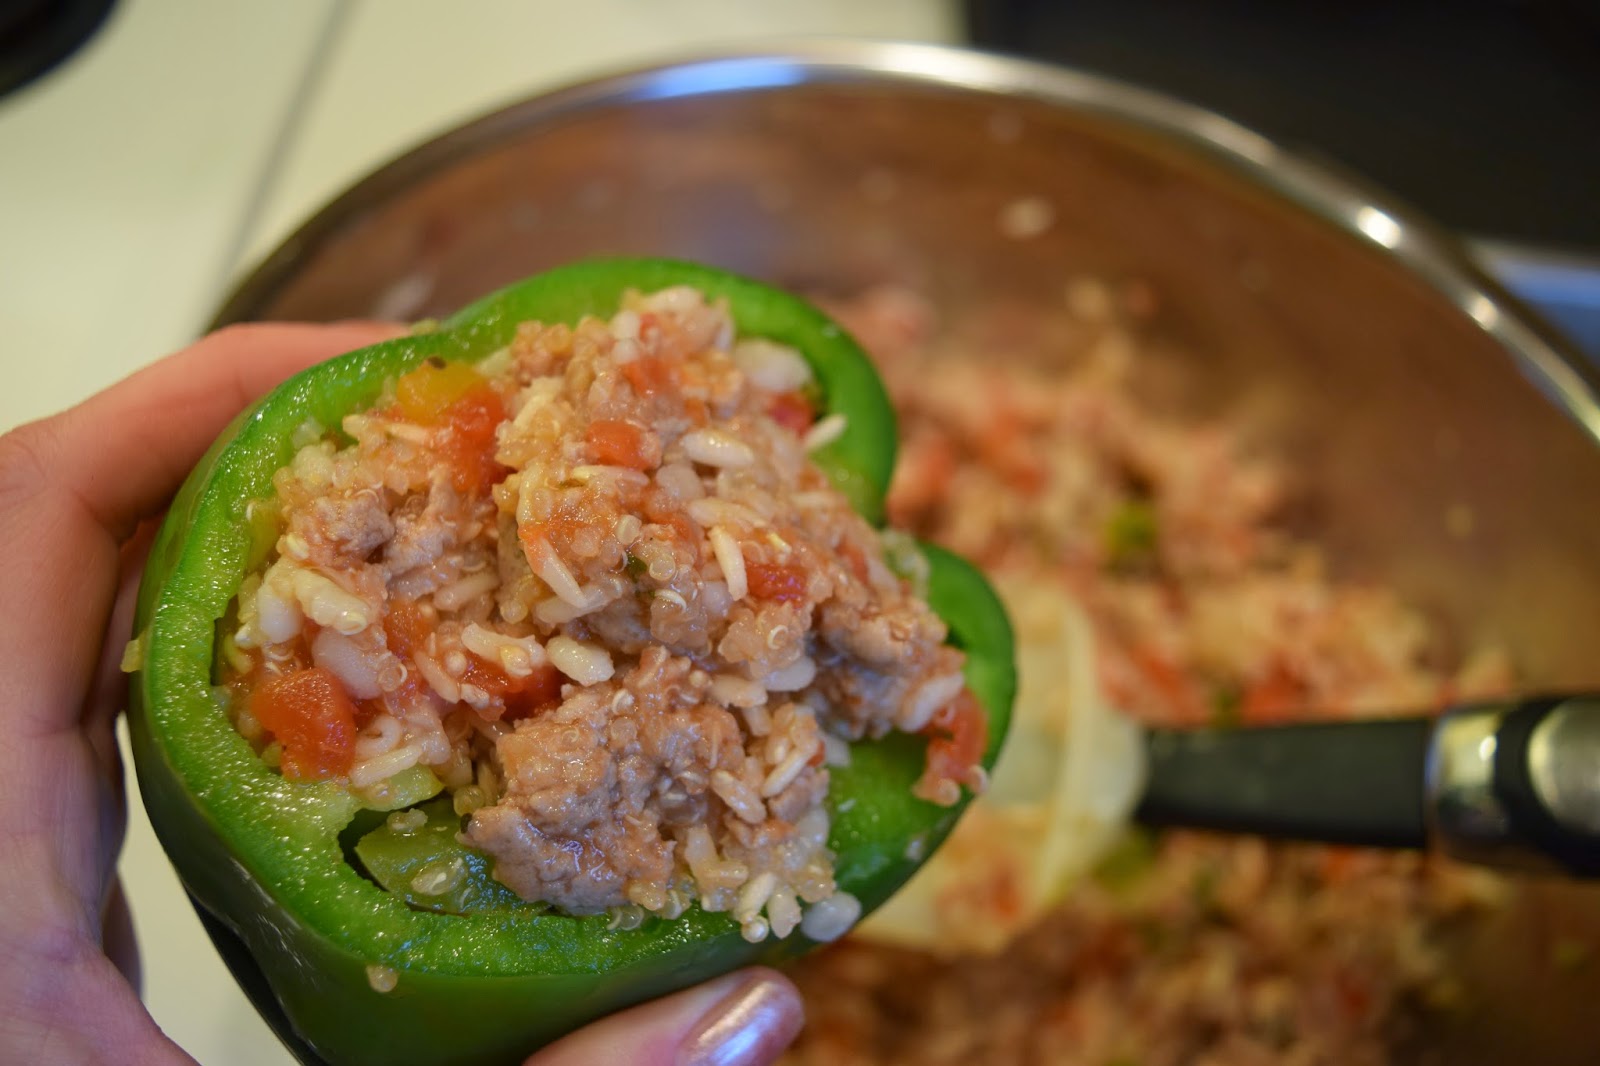
Stuffed Green Peppers!

These are a great vitamin and protein packed dinner. You can make it a vegetarian dish as well by simply leaving out the turkey sausage.

STUFFED PEPPERS
Prep Time: 30 minutes
Cook Time: 1 hour
Serves: 8

INGREDIENTS
8 Green Bell Peppers, tops removed and diced
1 lb ground turkey sausage
1 medium yellow onion, diced
1 can diced tomatoes
1 cup brown rice, cooked
1/2 cup quinoa, cooked
1 tsp parsley
1 tsp basil
1 tsp oregano
1 tsp ground pepper
2 cloves garlic, minced

TOPPINGS
1 cup part-skim mozzarella cheese
1/2 cup shredded Parmesan cheese
1 tbsp red pepper flakes

DIRECTIONS


  1. Preheat oven to 375 degrees (If preparing ahead of time, save this step for later.) 
  2. In a large skillet, brown the ground turkey sausage. 
  3. Once browned, strain the juices, and place back in the skillet. Add in the diced onion, green pepper tops, can of tomatoes and juices, and seasoning. Mix until vegetables are tender. 


  1. Pour contents into a large mixing bowl. Add in rice and quinoa and mix together. (If you are preparing ahead of time you can go ahead and cover the mixing bowl and place it in the refrigerator. Add an extra 15 minutes to your cook time.) 

  1. 4. Divide contents of mixing bowl into the 8 bell peppers. 

  1. Bake for 45 minutes, then top with mozzarella and bake for an additional 10-15 minutes or until cheese is melted and browned. 

  1. Top with Parmesan and red pepper flakes. Enjoy!


Tuesday, January 20, 2015

New Fit & Fab Mom Apparel!

With the Fit & Fab Mom class just around the corner the YMCA Executive Director and I have been conversing about different work out tank top designs. I am so excited to present the following four:


They will be presented on two different style tank tops: a fitted ribbed tank or a looser fit racer back. I will be ordering all 4 personally, probably in varying colors. More to come!

Monday, January 19, 2015

Pregnancy Full-Body Morning Stretch Routine


This morning I was a bit sore from the previous week's workouts. Pregnancy soreness is common for most Moms-to-be anyway - its our body's way of preparing for childbirth; hence why the aches and pains become that much more prominent the closer to our due dates we get.

To help prevent the discomfort as much as I possibly can and to keep me active I have implemented a morning stretching routine I try to incorporate into my coffee-time as often as I can.


Below is a series of stretches to help you get on with your day - pregnant or not! It is just a good stress relieving, relaxing habit to get into. 
Stretch your hands up to the ceiling. Involve your whole body down to your tippy toes.

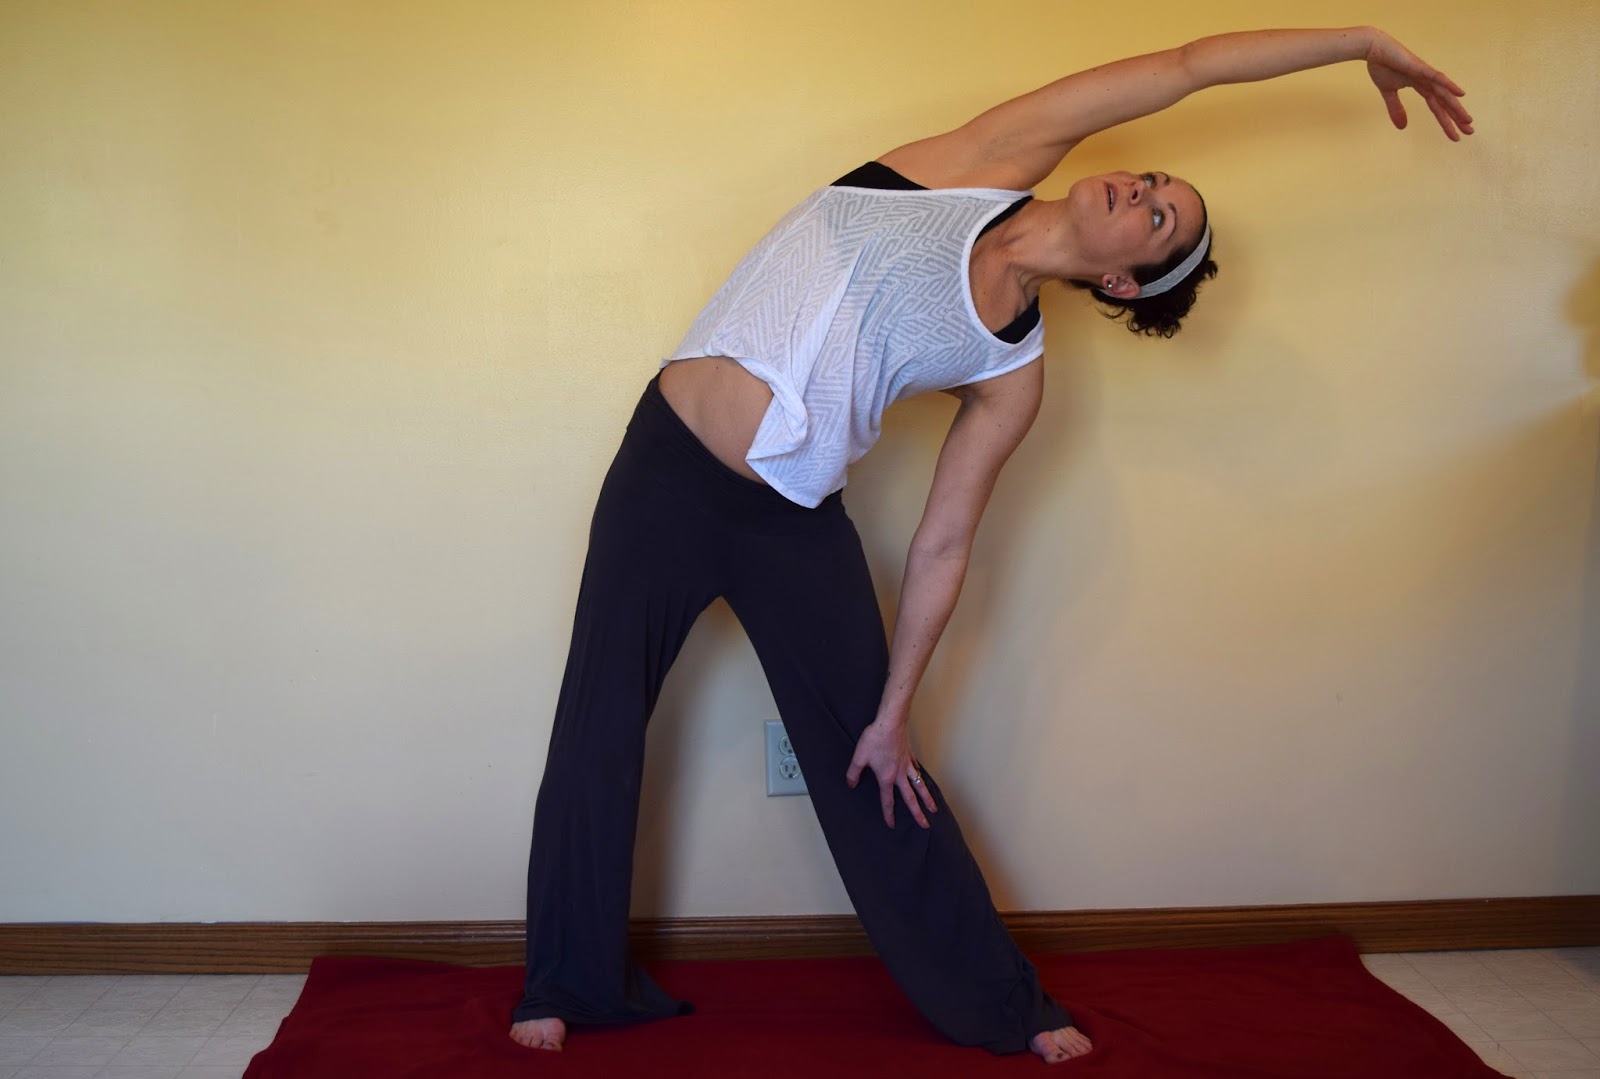
Reach your arm over to the side, creating a streamline from your waist through your fingers. Make sure to repeat the stretch on both sides.
Bring your elbows down to your hips and push against the inside of your knees to stretch the groin and hips.
Rotate to one side and place both hands inside the bent knee stretching out the hip and inner thigh.
Come down to rest on your right leg, rest your arms over the bent leg stretching out the thigh..
Sit up straight, bring one leg in and stretch the other leg out. Reach over towards the toes, stretching out the hamstring and back.
Come on to all fours for Cat Pose, extend the head and rear upwards, bringing the chest and belly towards the floor; then reverse the move by bringing the back up towards the ceiling, and the head and hips in toward the chest to stretch out the back.
To complete the back stretches, come down for Child's Pose.

Last but not least, bring the feet together for Butterfly Stretch. Pull the feet in close to the body and lean over, stretching out the inner thighs and lower back. 


Enjoy your day! 

My stretch this morning was followed by a delicious easy-to-make breakfast of Whole Grain Raisin French Toast (continue reading for the recipe)! Then followed by a 6 mile run powered by my protein and carb packed breakfast.

At 15 weeks now, I don't know how much longer I will be able to manage these long runs, so stretch stretch stretch I must! 


Whole Grain Raisin French Toast

Prep Time: 5 Minutes
Cook Time: 15 Minutes
Serves: 6-8

1 loaf Aunt Millie's Whole Grain Cinnamon Raisin Bread
2 cups 2% (or skim) milk
4 eggs
1/4 cup ground cinnamon
1/4 cup sugar (optional)

In a large bowl mix together your milk and eggs.


Dip the bread in the eggs, but don't allow to get too soggy!
Spray a pan with nonstick cooking spray and set to Medium.


Cook until either side is nicely browned.
Sprinkle with cinnamon and sugar.


Enjoy!

Saturday, January 17, 2015

An Interview with the Girl Scouts; PLUS Melt-in-your-mouth Slow Cooker Pot Roast


Sometimes the life of a freelancer can be daunting. Constantly waiting on editors to send assignments, pushing through the busy times only to sit patiently through the slower times... but on occasion, it is filled with excitement and some really uplifting benefits...


Like GIRL SCOUT COOKIES! 

I ask you, what is better than a delicious, indulgent treat that actually serves as the catalyst for a good cause like the Girl Scouts? 

Today I interviewed the Central Indiana Director of Advocacy and Community Development Becky Buse for a story on the Cookie College. The Cookie College is a program designed to  teach young girls skills which will help bring them success later in life, such as financial planning, team building, goal setting, and much more. This organization, one I am afraid I was not very familiar with prior to this interview, sets out to empower young women. 

HOW HAVE I NOT BEEN INVOLVED WITH THEM BEFORE?

As a woman and mother of a future woman of America, I make it a goal to teach McKinley the importance of making her own way in the world, just as my parents taught me. Since I was involved in sports growing up I didn't have much time for other clubs and organizations such as the Girl Scouts, but any group of individuals who makes it their goal to teach women how to have an impact on the world gets a big vote of confidence from this Mama. Becky invited me to speak at an event next month as a "Young CEO" (I'm so flattered) to inspire these girls to strive for their goals. It has turned out to be quite the Saturday! 

While I was off learning about woman empowerment, my wonderful husband had a play date with McKinley. It's unseasonably warm out right now at 45 degrees in January so they had a park date! 


McKinley has missed the outdoors so much, so any chance we get to let her play outside without risk of ending up sick, we take. 

Since we have been so busy today, the crock pot is-a-cookin'. Below is the recipe for a delicious, flavorful and lean Slow Cooker Pot Roast. Happy Weekend Everybody and YOU GO GIRLS! 

For more information on the Girl Scouts of Central Indiana: www.girlscoutsindiana.org/

Slow Cooker Pot Roast
For a flavorful, inexpensive meal that will feed quiet a few, this Pot Roast is a great choice. It's filled with vegetables, loaded with vitamins and protein. This is a great dish for a pregnant Mama and will certainly go over well with the hubby!

Serves: 4-6
Prep time: 20 minutes
Cook time: 8-10 hours (4-5 on high)

INGREDIENTS
4-5 lb Bottom Round Roast (or whatever is on sale at the Market)
5 large carrots
1/2 pound green beans
5 stalks of celery
6 yellow potatoes
1 medium yellow onion
2 cloves garlic, minced
3 cups low sodium beef broth
2 cups water
2 tbsps Worcestershire
1 tbsp low sodium soy sauce
1 tbsp pepper
1 tsp salt
2 tsps onion powder
2 tsps garlic powder
2 tsps oregano
1 tsp parsley

INSTRUCTIONS
Trim the fat off of your of your meat and tenderize.

Mix all of the dry ingredients in a small bowl.
Rub both sides of your roast with the dry ingredients and place it in the center of the crock pot.
Surround the roast with beef broth, water, Worcestershire, soy sauce and garlic.
Chop the carrots, onions, celery and potatoes; trim the ends of the green beans.


Place the potatoes and carrots in first, near the bottom, around the roast, then add in the celery, onion and green beans.
Cook on low for 8-10 hours or high for 4-5.


It is so tender it just pulls apart. No knife necessary. Enjoy!